End-to-end testing is one of the vital aspects that establishes the working nature of a particular software product. It helps discover the issues that could not be found in earlier units as well as integration testing, and helps establish how well or how poorly the software performs its functions.
End-to-end tests that consist of many user steps and journeys are performing such tests is a laborious task. Thus, the end-to-end test case team decides on the automation testing of the end-to-end test cases.
In this article, we will learn about end-to-end testing with Playwright and TypeScript and how that can be implemented in a test automation framework.
What Is Playwright End-to-End Testing?
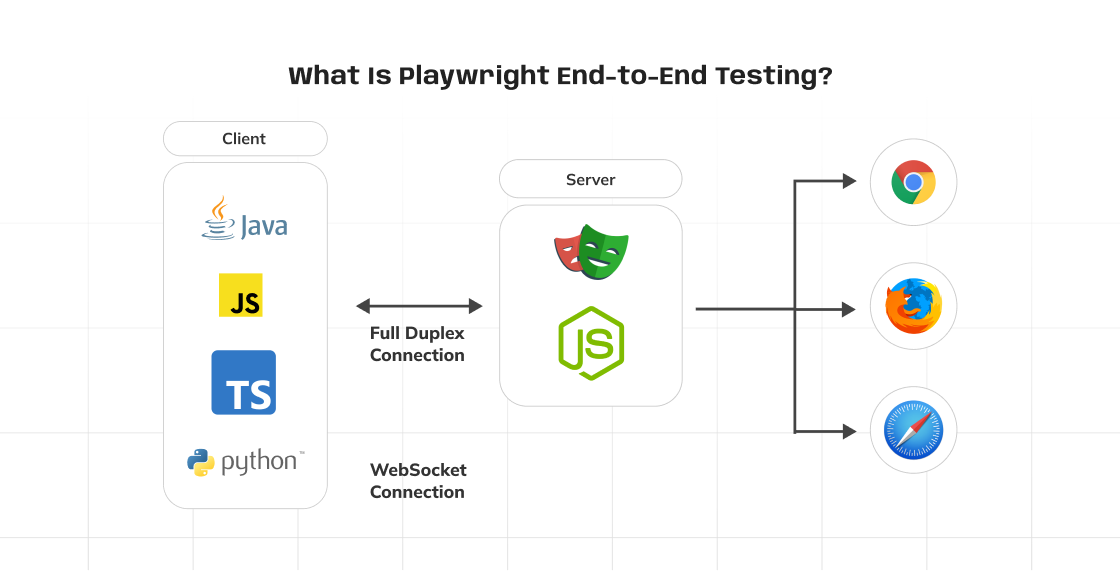
As users are the basis for systems’ overall usability, so Playwright end-to-end testing enables developers and testers to perform the actions of actual users on web applications. In Playwright, for instance, such actions as clicking buttons, completing text boxes, and flipping pages are all possible to be automated to validate whether certain functionality has been implemented correctly. Playwright supports modern web browsers such as Chrome, Firefox and WebKit/Safari as well as Microsoft Edge.
Prerequisites for Playwright End-to-End Testing
To use Playwright, it is essential to have NodeJS version 18 or higher along with TypeScript installed. There are two methods by which Playwright can be installed:
- Command Line
- VS Code
However, in this article, let’s use VS Code to install Playwright.
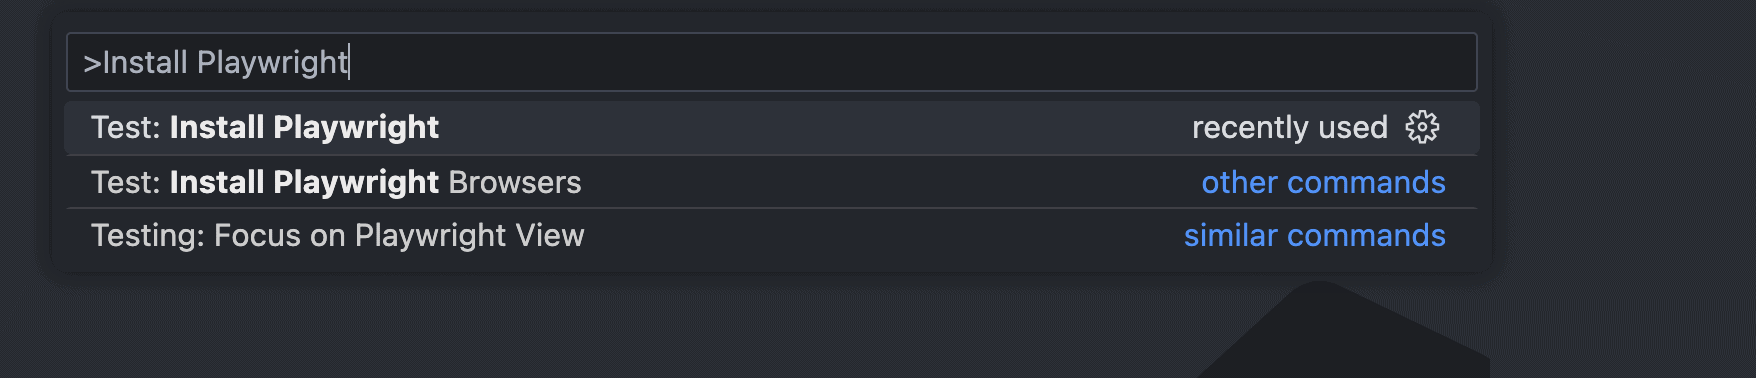
1. After installing Playwright from the VS Code marketplace, let’s open the command panel and run the command Install Playwright:
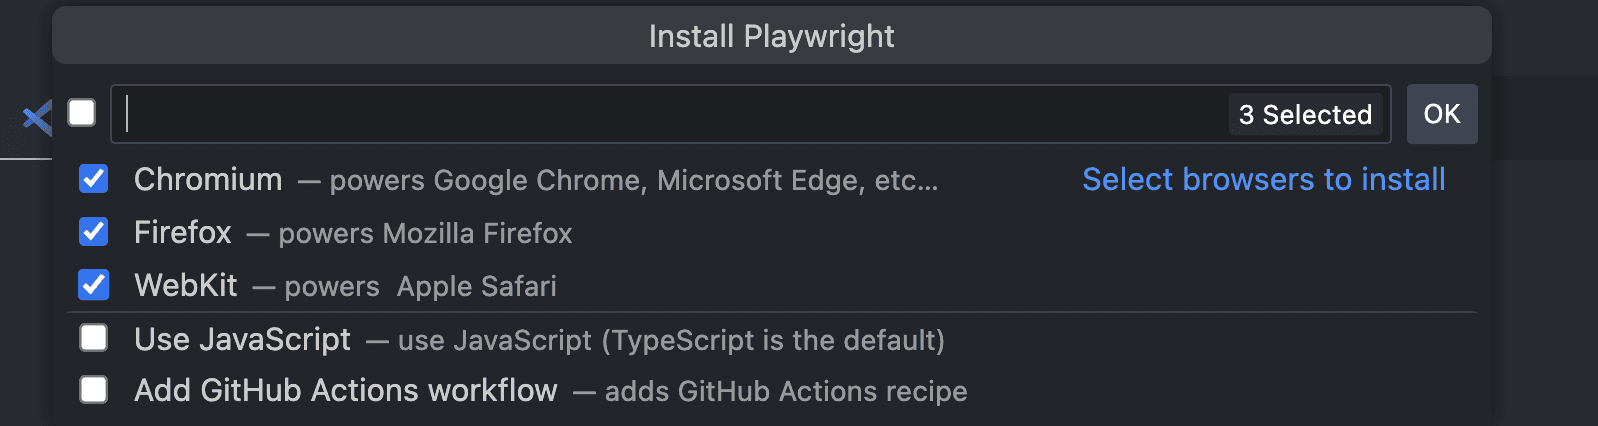
2. Let’s install the required browsers. We will then click on OK:
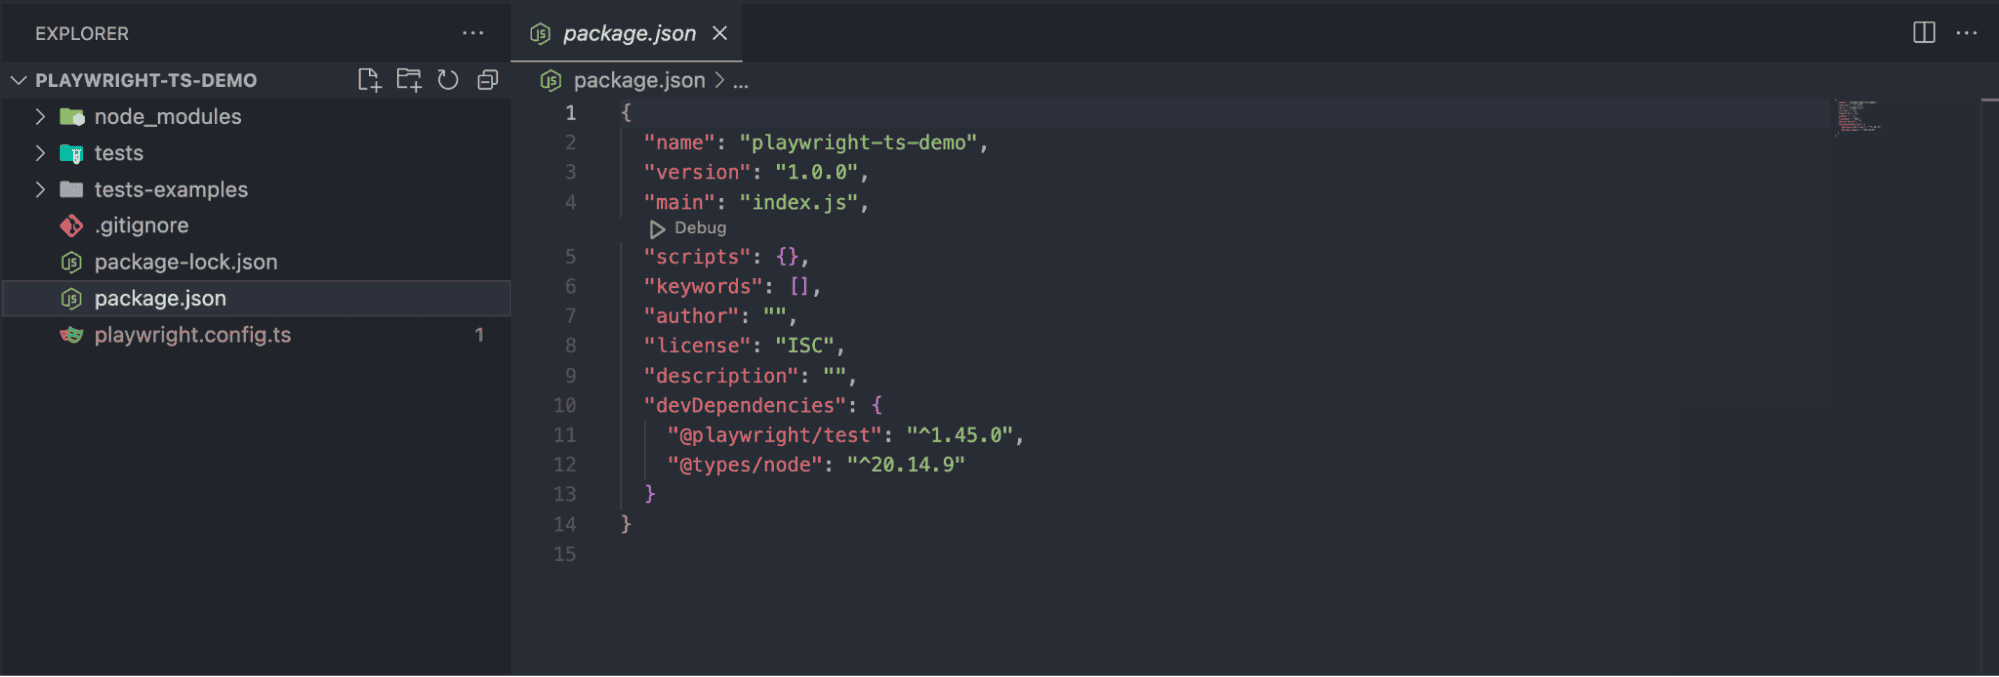
3. After installation, we will get the folder structure containing the dependencies in the package.json file:
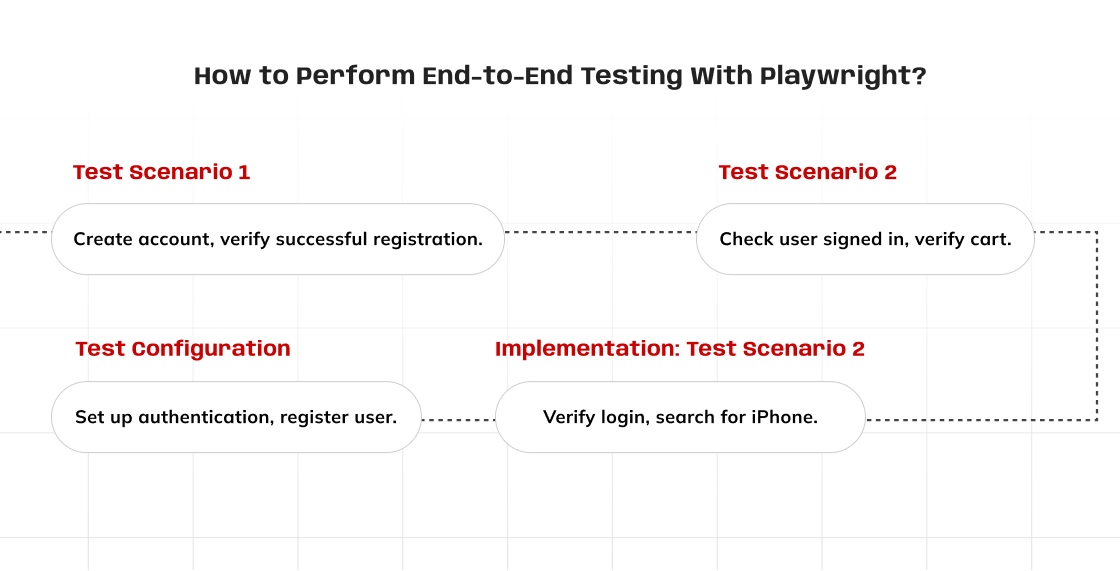
How to Perform End-to-End Testing With Playwright?
End-to-end testing involves executing the ideal use cases of end users. Let’s take the eCommerce Playground site by LambdaTest as an example to write end-to-end tests.
We will pursue the cloud-provisioned testing strategy through LambdaTest for end-to-end testing to enhance the scope and reliability of the application. LambdaTest is an AI-driven test execution platform which provides automation testing using Playwright on more than 3000 real browsers and Operating Systems.
Test Scenario 1
Go ahead and add a new User account on LambdaTest eCommerce Playground.
There should be an assertion that performs the check about the successful registration on the platform.
Test Scenario 2
There should be an assertion that performs the check about the user status i.e. whether the user is signed in or not.
On the landing page, look for a certain product.
Choose the item and put it in the shopping basket.
There should be an assertion that checks if the right item has been added to the cart.
Test Configuration
Let’s create a fixture file enabling authentication once per worker by overriding the fixture ‘storage state’. We can use testInfo.parallelIndex to distinguish between workers.
Moving on, this same fixture file can also be used to set the LambdaTest capabilities. Now we will create a folder called base and a file called page-object-model-fixture.ts.
This takes care of the first block, which consists of the import statements for npm packages and other project directories as well. We will import expect, chromium and test as baseTest variables and utilize dotenv to load environment variables. Then we can define page object class instances in the fixture text and directly in the test as well.
The next block involves adding the LambdaTest capabilities:
const modifyCapabilities = (configName, testName) => {
let config = configName.split("@lambdatest")[0];
let [browserName, browserVersion, platform] = config.split(":");
capabilities.browserName = browserName;
capabilities.browserVersion = browserVersion;
capabilities["LT:Options"]["platform"] =
platform || capabilities["LT:Options"]["platform"];
capabilities["LT:Options"]["name"] = testName;
};
We can easily generate these capabilities using the LambdaTest Capabilities Generator.
The next block of lines will use the LambdaTest capabilities by customizing and creating a project name. The project name is ideally the browser, browser version, and platform name combination that could be used in the format
“chrome:latest:macOS Sonoma@lambdatest”
projects: [
{
name: "chrome:latest:macOS Sonoma@lambdatest",
use: {
viewport: {
width: 1920,
height: 1080,
},
},
},
{
name: "chrome:latest:Windows 10@lambdatest",
use: {
viewport: {
width: 1280,
height: 720,
},
},
},
The next block of code has been divided into two parts. In the first part, the testPages constant variable is declared and has been assigned to baseTest extends the pages type declared initially in the fixture file as well as the workerStorageState:
const testPages = baseTest.extend<pages, { workerStorageState: string; }>({
page: async ({}, use, testInfo) => {
if (testInfo.project.name.match(/lambdatest/)) {
modifyCapabilities(testInfo.project.name, `${testInfo.title}`);
const browser =
await chromium.connect(
`wss://cdp.lambdatest.com/playwright?capabilities=
${encodeURIComponent(JSON.stringify(capabilities))}`
);
const context = await browser.newContext(testInfo.project.use);
const ltPage = await context.newPage();
await use(ltPage);
const testStatus = {
action: "setTestStatus",
arguments: {
status: testInfo.status,
remark: getErrorMessage(testInfo, ["error", "message"]),
},
};
await ltPage.evaluate(() => {},
`lambdatest_action: ${JSON.stringify(testStatus)}`
);
await ltPage.close();
await context.close();
await browser.close();
} else {
const browser = await chromium.launch();
const context = await browser.newContext();
const page = await context.newPage();
await use(page);
}
},
homePage: async ({ page }, use) => {
await use(new HomePage(page));
},
registrationPage: async ({ page }, use) => {
await use(new RegistrationPage(page));
},
});
In the second part of the block, the workerStorageState is set where each parallel worker is authenticated once. All tests use the same authentication state a worker runs:
storageState: ({ workerStorageState }, use) =>
use(workerStorageState),
workerStorageState: [
async ({ browser }, use) => {
const id = test.info().parallelIndex;
const fileName = path.resolve(
test.info().project.outputDir,
`.auth/${id}.json`
);
},
],
The authentication will be done once per worker with a worker-scoped fixture. We need to ensure we authenticate in a clean environment by unsetting the storage state:
const page = await browser.newPage({ storageState: undefined });
The authentication process should be updated in the fixture file next. It includes the user registration steps, as discussed in test scenario 1.
Implementation: Test Scenario 1
First, we will create two-page object classes to hold locators and functions for interacting with each page’s elements. Let’s create a new folder named pageobjects in the tests folder. The first-page object class will be for the homepage:
import { Page, Locator } from "@playwright/test";
import { SearchResultPage } from "./search-result-page";
export class HomePage {
readonly myAccountLink: Locator;
readonly registerLink: Locator;
readonly searchProductField: Locator;
readonly searchBtn: Locator;
readonly logoutLink: Locator;
readonly page: Page;
constructor(page: Page) {
this.page = page;
this.myAccountLink = page.getByRole("button", { name: " My account" });
this.registerLink = page.getByRole("link", { name: "Register" });
this.logoutLink = page.getByRole("link", { name: " Logout" });
this.searchProductField = page.getByPlaceholder("Search For Products");
this.searchBtn = page.getByRole("button", { name: "Search" });
}
async hoverMyAccountLink(): Promise {
await this.myAccountLink.hover({ force: true });
}
async navigateToRegistrationPage(): Promise {
await this.hoverMyAccountLink();
await this.registerLink.click();
}
}
On the homepage, we first need to hover over the “My account” link to open the menu dropdown and click the register link to open the registration page:
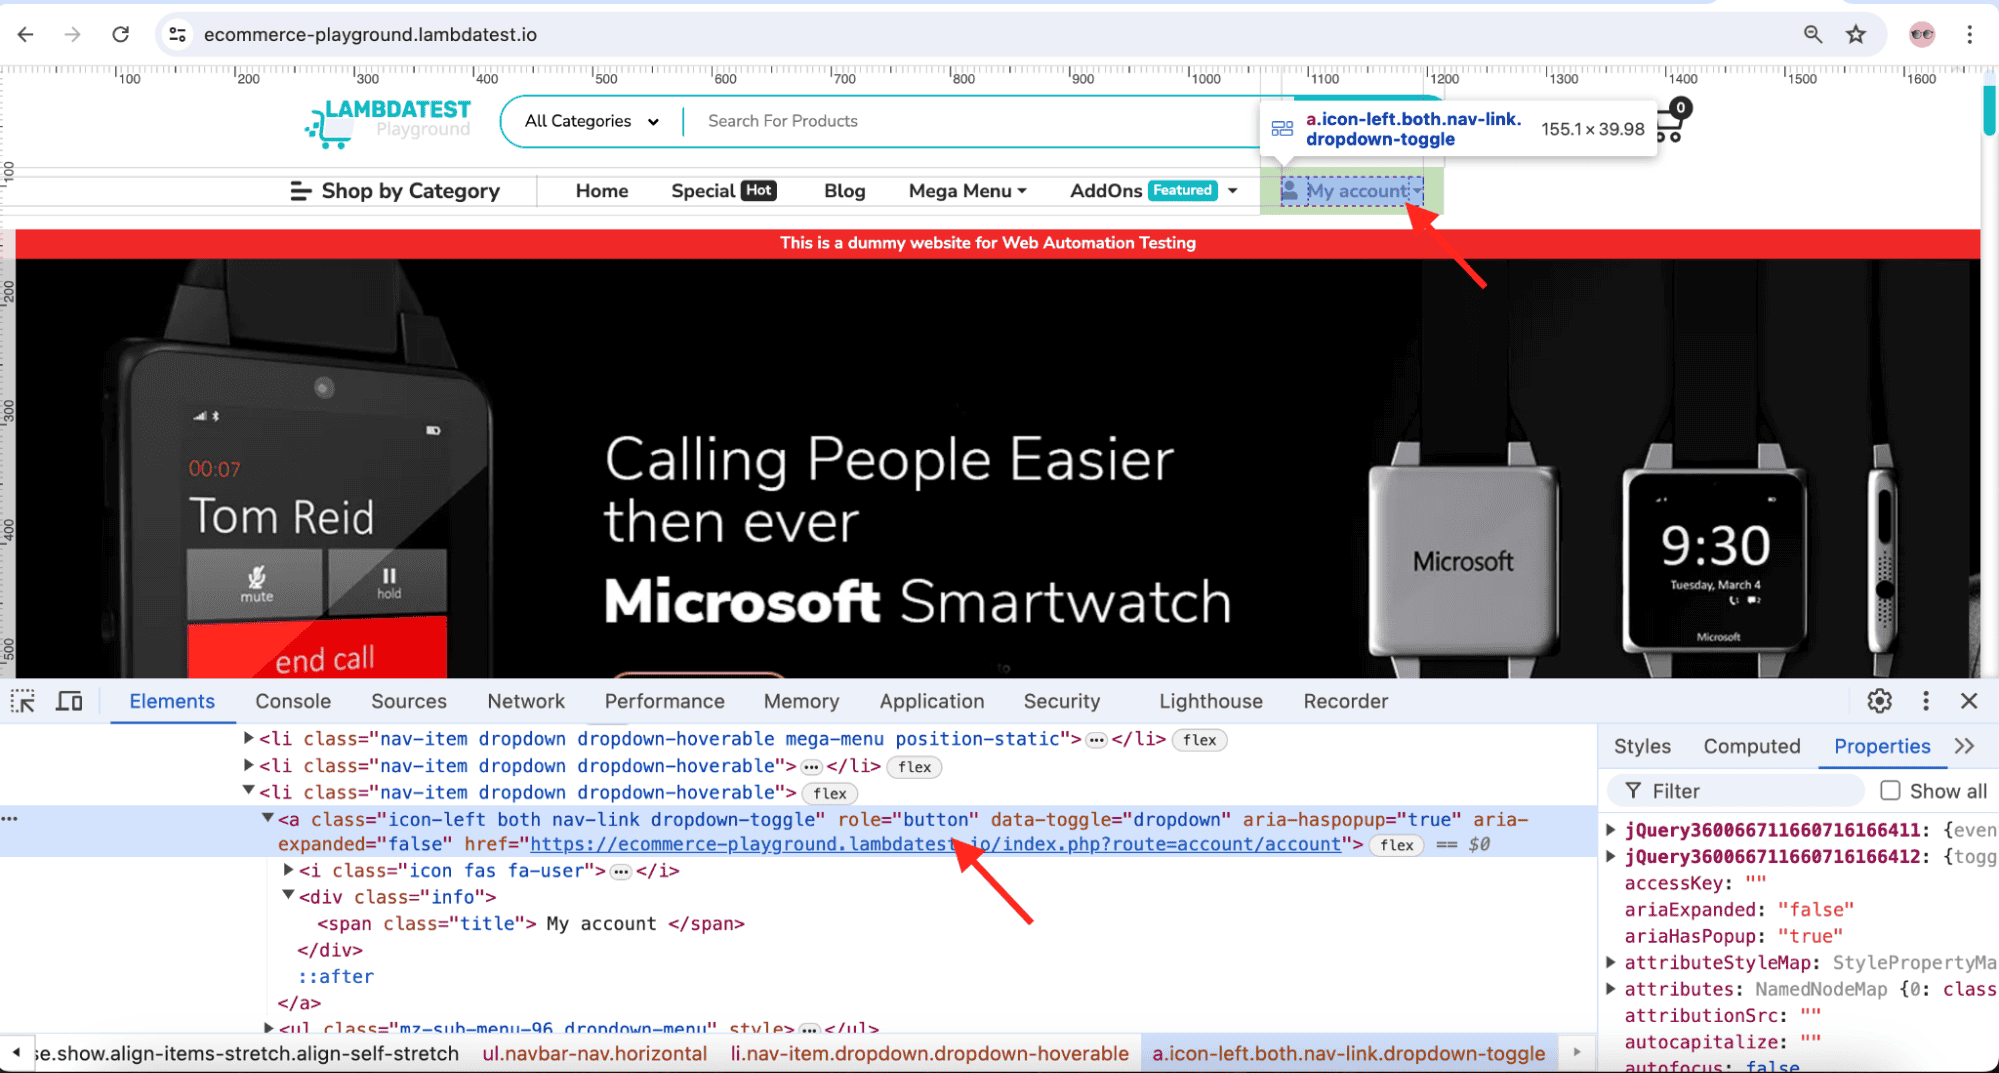
In the Chrome “DevTools” window, the “My account” WebElement role is a button. Hence, let’s locate this link using the following code:
this.myAccountLink = page.getByRole("button", { name: " My account" });
Let’s hover the mouse over the MyAccountLink to open the dropdown to view and click on the register link:
async hoverMyAccountLink(): Promise {
await this.myAccountLink.hover({ force: true });
}
The register link must be located and clicked to open the registration page. We can notice the registerLink locator in the Chrome DevTools; the role of this WebElement is that of a link:
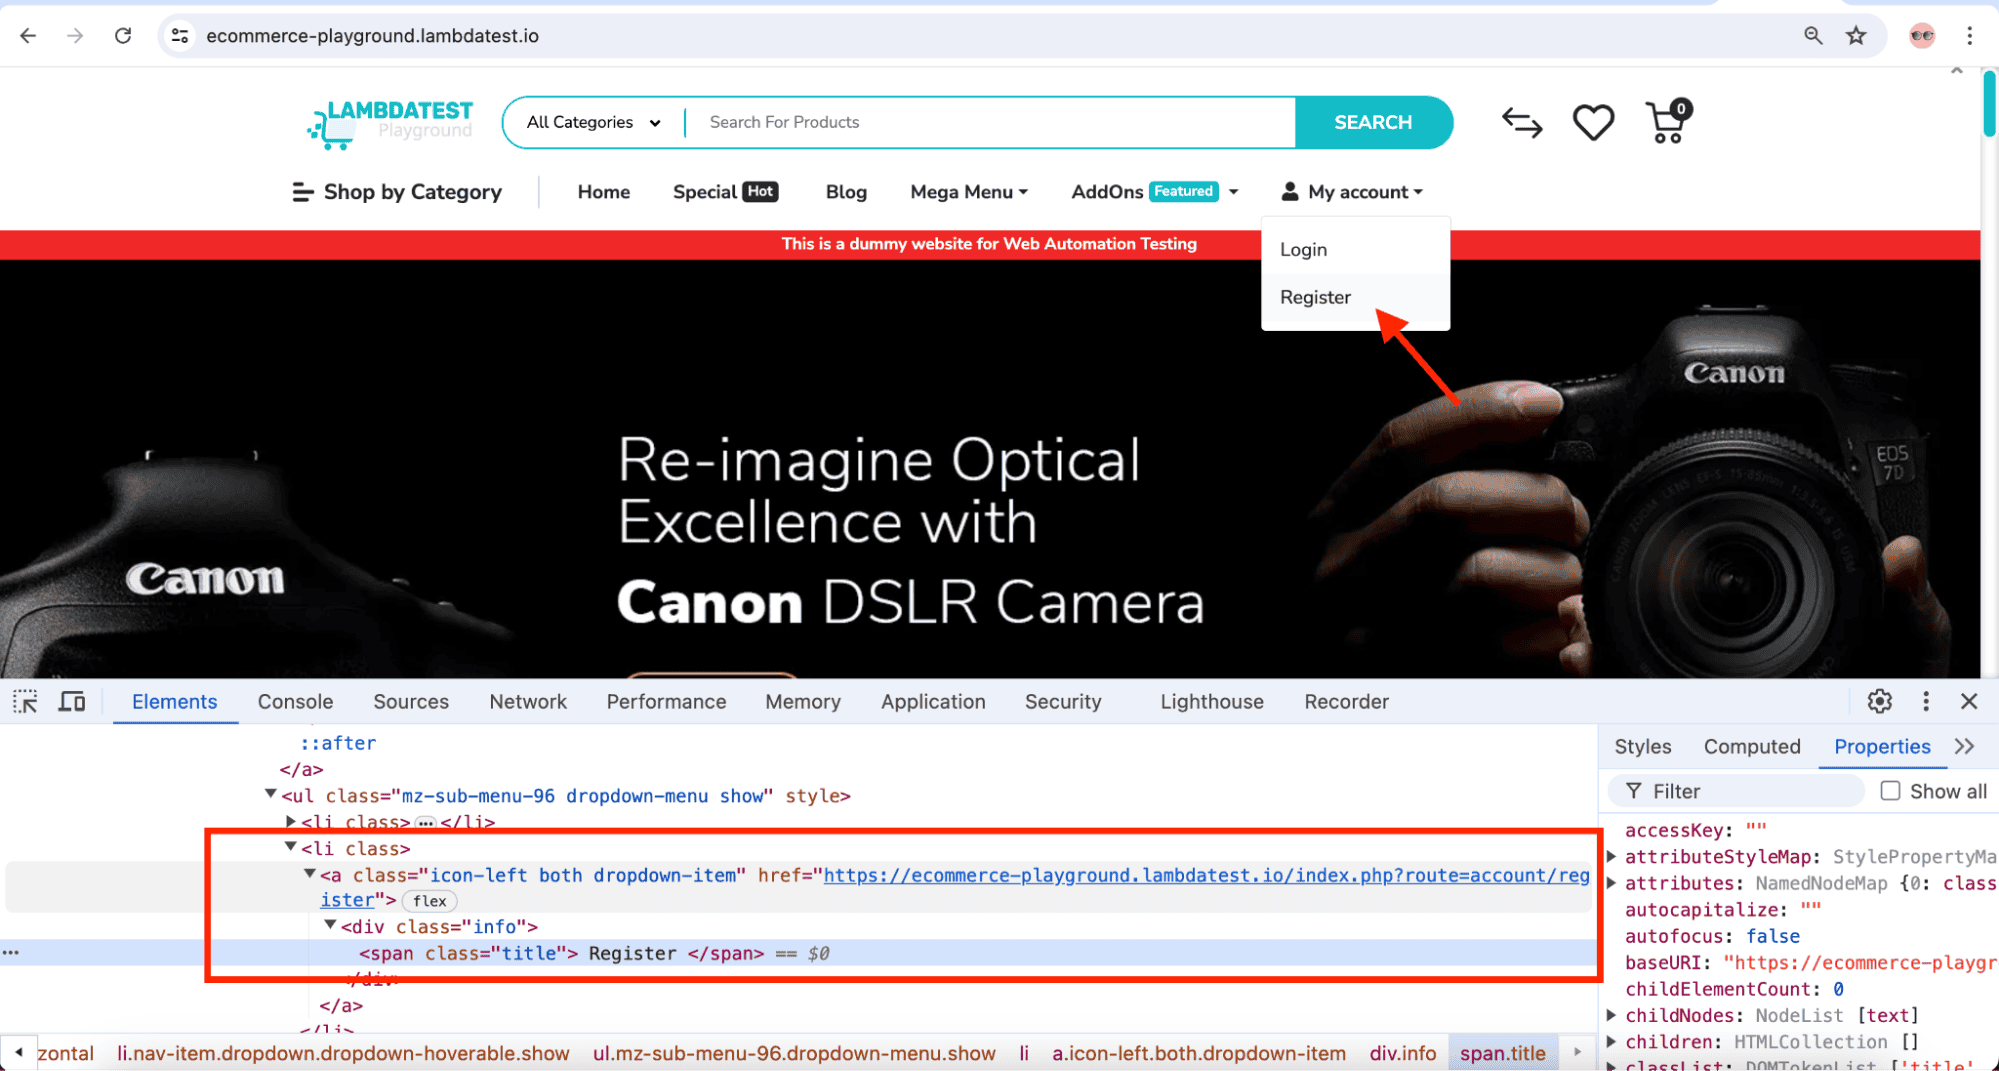
The following function will hover over the MyAccountLink, and when the dropdown opens, it will locate and click on the registerLink:
async navigateToRegistrationPage(): Promise {
await this.hoverMyAccountLink();
await this.registerLink.click();
}
Let’s create the second-page object class for the registration page, which will hold all the fields and functions for performing interactions:
async registerUser(
firstName: string,
lastName: string,
email: string,
telephoneNumber: string,
password: string
): Promise {
await this.firstNameField.fill(firstName);
await this.lastNameField.fill(lastName);
await this.emailField.fill(email);
await this.telephoneField.fill(telephoneNumber);
await this.passwordField.fill(password);
await this.confirmPassword.fill(password);
await this.agreePolicy.click();
await this.continueBtn.click();
return new MyAccountPage(this.page);
}
In the subsequent test scenario, we will introduce a product and check that the cart details reflect the appropriate numbers.
In the first assertion, the user expects conducive whether or not he or she is logged into his or her account. The assertion is visible while a user hovers the mouse around MyAccountLink and the Logout navigation option appears in the menu.
Now, we will demonstrate how to search for a specific product from the search box that is located on the home page.
const searchResultPage = await homePage.searchForProduct("iPhone");
await searchResultPage.addProductToCart();
The search results will appear on the searchResultPage. The addProductToCart() function will mouse hover over the first product on the page retrieved in the search result. It will click the Add to Cart button when the mouse hovers over the product.
A notification pop-up will appear, displaying a confirmation text:
await expect(searchResultPage.successMessage).toContainText(
"Success: You have added iPhone to your shopping cart!"
);
const shoppingCart = await searchResultPage.viewCart();
To confirm that the cart has the product, first assert the confirmation text on the pop-up, then click the viewCart button to navigate to the shopping cart page.
An assertion finally verifies that the product name iPhone in the shopping cart confirms the addition of the searched product:
await expect(shoppingCart.productName).toContainText("iPhone");
The following command will run the tests on the Google Chrome browser on the local machine:
$ npx playwright test --project=\"Google Chrome\"
The following command will run the tests on the latest Google Chrome version on macOS Sonoma on the LambdaTest cloud grid:
$ npx playwright test --project=\"chrome:latest:macOS Sonoma@lambdatest\"
Let’s update the respective commands in the scripts block in the package.json file:
"scripts": {
"test_local": "npx playwright test --project=\"Google Chrome\"",
"test_cloud": "npx playwright test --project=\"chrome:latest:macOS Sonoma@lambdatest\""
}
So, if we want to run the tests locally, run the command:
$ npm run test_local
To run the tests over the LambdaTest cloud grid, we can run the command:
$ npm run test_cloud
After the test execution, we can view the test results on the LambdaTest Web Automation Dashboard and in the build details window:
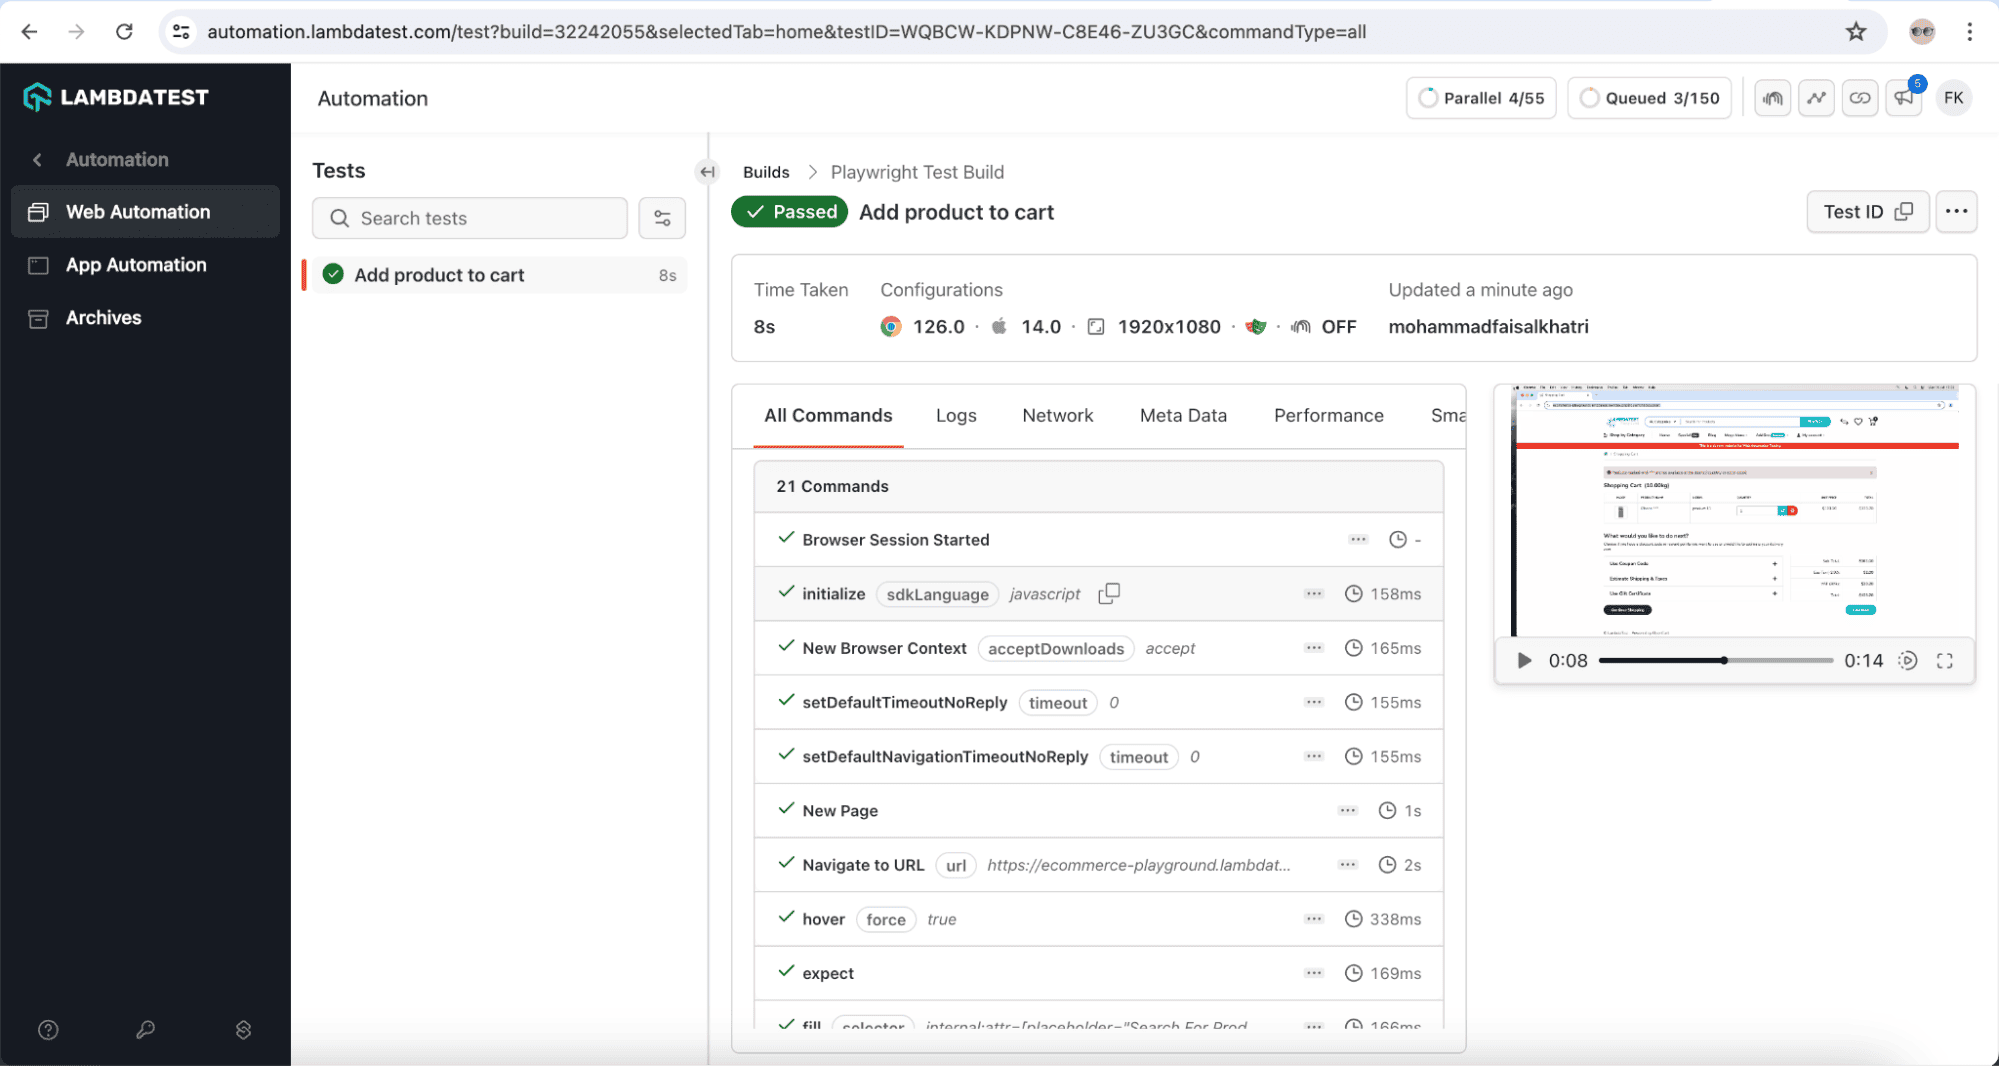
The build details screen provides information such as the platform, browser name and its respective versions, video, logs, commands executed, and time taken to run the tests.
Conclusion
Playwright is a modern testing framework which is simple and less code-intensive. Both developers and testers can install it with different programming languages.
Integration of playwright with type script is way more convenient because we do not have to use a lot of code in terms of configurations and setups. At first, there is a straightforward command to install the program and then one can immediately commence writing the tests.
And for the individuals who wish to go beyond the standard Playwright workflows, solutions such as Braincuber address test management, reporting, and insights effectively helping in the entire testing process lifecycle from test design to execution and monitoring.